This section explains how to break up data in a block and describes the different options available to format and manage these breaks.
A break is a division within a block in which data is grouped according to a selected dimension, detail, or measure into self contained sections. These sections are represented as smaller tables within the same block of data.
You use breaks to display all the data for each unique value of an object in separate parts.
Using breaks has two main advantages:
You can more efficiently organize how your data is represented.
You can display subtotals.
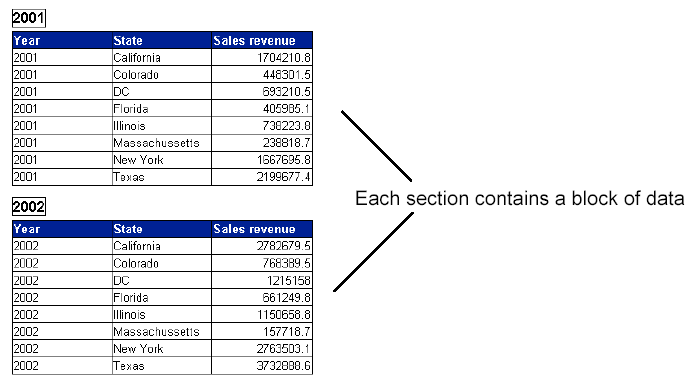
A section breaks up the data into multiple free-standing cells called section headers. Each section header contains one value for a dimension, with a block of data that corresponds to the dimension value.
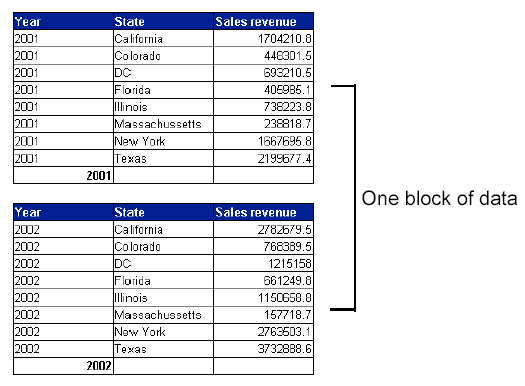
A break divides the data up within one block. One column contains the values for a dimension, detail, or measure, which are repeated for each other row of values in the block.
When you insert a break on an object, the values for the object are automatically sorted in ascending order as follows:
If the values are numeric, the lowest value appears in the first row of the table, the highest in the last row.
If the values are alphabetical characters, then the values are sorted in alphabetical order from top to bottom.
You can change this sort order at any time.
You can set multiple breaks and set a sort priority on each break, so that you control how the data is displayed when you insert multiple breaks across several dimensions details, or measures.
You can insert a break on any one dimension, detail, or measure.
To insert or remove a break:
Make sure you are in Edit
mode with the HTML Report Panel open and verify you are on the Properties
tab.
If the Properties tab is not visible, check the More report options
checkbox.
A document can contain multiple reports. The name of the selected report
appears in the Current report dropdown list box.
Leave the displayed report
selected.
Or
Select a different report by clicking the arrow next to the Current
report dropdown list box, and then select a different report from the
list.
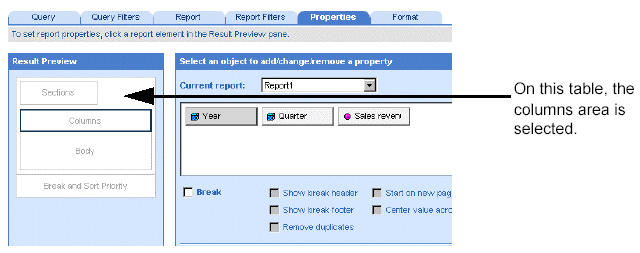
The Result Preview pane displays the structure of the report block.
(A block is a table, form, or chart).
On the Result Preview pane,
click the part of the block on which you want to apply or remove a break.
If you are working with a table or crosstab you can select the columns,
or rows, or body. If you are working with a form you can select the title
or value.
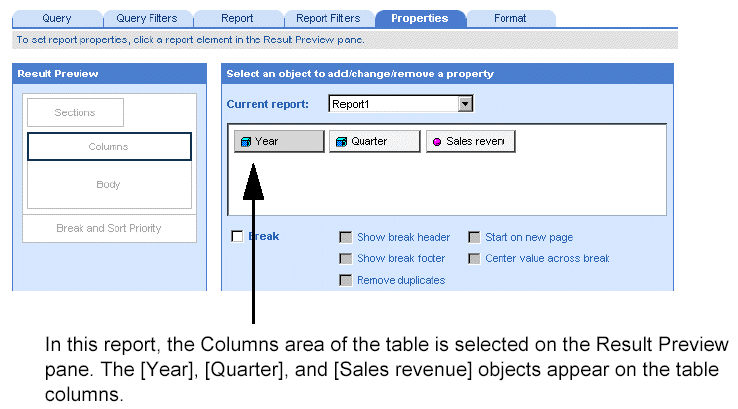
Select the object on which
you want to apply or remove the break.
For example, if you want to break up the table values for each quarter,
select [Quarter].
The next step depends on
whether you want to apply or remove a break:

Click Run, if you are generating
the results for the first time.
Or
Click Apply, if you have already generated the results once.
WebIntelligence applies the sort to the results displayed in the report.
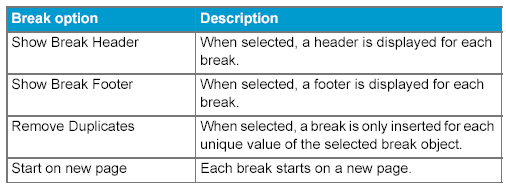
You can define the following properties for a break:
To set break properties:
Make sure you are in Edit
mode with the HTML Report Panel open and verify you are on the Properties
tab.
If the Properties tab is not visible, check the More report options
checkbox.
A document can contain multiple reports. The name of the selected report
appears in the Current report dropdown list box.
Leave the displayed report
selected.
Or
Select a different report by clicking the arrow next to the Current
report dropdown list box, and then select a different report from the
list.
The Result Preview pane displays the structure of the report block.
(A block is a table, form, or chart).
On the Result Preview pane,
click the part of the block on which you want to apply or remove a break.
If you are working with a table or crosstab you can select the columns,
or rows, or body. If you are working with a form you can select the title
or value.
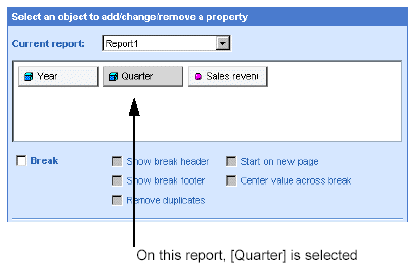
Select the object for which
you want to set the break properties.
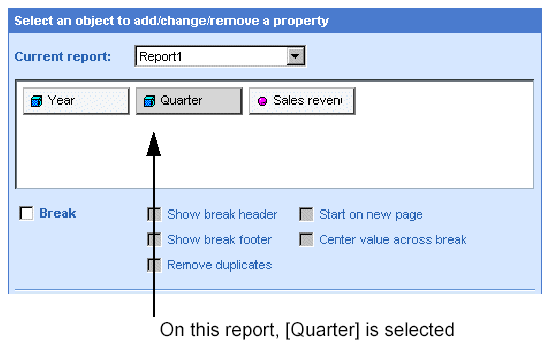
Select or clear break properties check boxes as required.
Click Run, if you are generating
the results for the first time.
Or
Click Apply, if you have already generated the results once.
WebIntelligence applies the sort to the results displayed in the report.